Transcode Sony XDCAM MXF/IMXF files to ProRes 422 For Final Cut Pro
XDCAM, introduced by Sony in 2003, has four different products lines, including the XDCAM SD (SD XDCAM is an IMX format wrapped in an MXF file), XDCAM HD, XDCAM EX and XDCAM HD422, differing in types of encoder used, frame size, container type and in recording media. Designed for heavy-duty field acquisition, Sony XDCAM camcorders provide the excellent picture quality, operability and reliability. Whereas, there’re some issues always around the Sony XDCAM users when trying to import and edit Sony XDCAM media files in Final Cut Pro even with lastest FCP X 10.0.8.
In fact, to be able to import Sony XDCAM, XDCAM HD and XDCAM EX media into Final Cut Pro, you’ll need to download and install the Sony XDCAM Transfer software and XDCAM Drive software. While, if you haven’t install these XDCAM import Plug-in for Final Cut Pro correctly, it’s still a hard task to transfer Sony XDCAM media to FCP 7 or FCP X. So, you need to seek for other effective way. Even with the Plu-gin installed, some users would still meet the trouble due to its complex procedures.
Fortunately, there is an easy way to fix this issue. The effective way is to convert Sony XDCAM MXF/IMX files to Apple ProRes, which is natively suported by Final Cut Pro. To get the work done, UFUSoft MXF Converter for Mac is an ideal choice, which allows you to convert XDCAM files to Apple ProRes 422 MOV for smoothly editing in Final Cut Pro 6/7 and FCP X. Besides FCP, this Mac Sony XDCAM Converter also generates best editing format/codec for filmmakers and video enthusiasts to use in different NLE apps, such as After Effects CS4/CS5/CS6, Adobe Premiere Pro, Sony Vegas, iMovie, Final Cut Express and more. Just download it and follow the step-by-step guide below to achieve your goal smoothly.
Free Download the Mac Sony MXF to ProRes Converter:
How to Transcode Sony XDCAM MXF/IMXF files to ProRes 422 For Final Cut Pro
Step 1. Add Source Videos
Launch the professional Sony MXF Converter Mac, and then click “Add video” button to browse and load your source files. If you need to import an entire file folder directly, simply click “Add from folder” tab.
Step 2. Choose Output format
Go to “Format” menu and choose “Apple ProRes 422 (*.mov)” as target format from “Final Cut Pro” dialogue box.

Tip: If you want to set some parameters for the output profile, you could click the “Settings” button to set the output bitrate, encode, frame rate, resolution, sample rate, channels, etc.
Step 3. Start XDCAM MXF/IMX to FCP Conversion
When the former steps finished, you can press “Convert” button to start rewrapping Sony XDCAM files to Apple ProRes MOV for FCP. Once the conversion process is done, click “Open” button to get the generated MOV files.
NOTE: The FCP X does not install the ProApps QuickTime Codecs automatically, so you need download and install the codec manually from here.
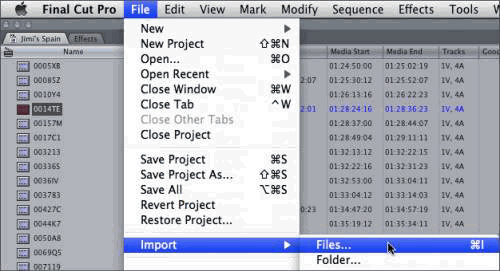
Step 4. Import the converted Sony XDCAM files to FCP project
Launch the Final Cut Pro, choose from File menu > Import > Files…

In this way, you can effortlessly import and edit Sony XDCAM files in Final Cut Pro smoothly.
Quick Learn:
Sony XDCAM IMX(also known as Betacam IMX or MPEG IMX) is a high-quality, standard definition, MPEG-2-based video format created by Sony. It can be recorded using NTSC or PAL video standards at three possible bit rates (30, 40, and 50?Mbps). IMX is not bound to a particular tape format or transmission method; IMX can just as easily be stored on tape, hard disk, or optical disc. In addition to standard video signal transfers via analog component and SDI interfaces, SDTI and Ethernet interfaces can be used to transfer native IMX data. IMX bridges the gap between traditional video formats and computer-based post-production systems by encapsulating video and audio data within an increasingly popular data format known as MXF.


